Showing posts with label Gifts. Show all posts

Travel Tissue Cover Tutorial

April is officially STASH BUSTER Month, per one of my favorite blogs Crafting a Green World.

What, you may ask, is a fabric shop owner doing participating in such an non buying event?

WELL,  I am an extremely talented hunter and gatherer of wonderful fabrics. I am there, I love fabric. Now I own a shop full of it, BUT what do I do with all the great fabrics that are languishing unused in my sewing room. Well, one thing for sure, I can't use them for shop samples, I did that ONCE and I finally took it down after explaining over 100 times that NO we did not have that fabric. So this month will be about sewing for me, my family and maybe for craft shows next November & December.


These 10 inch square were swapped from all over the world, but until yesterday they were sitting in a container on a shelf, forgotten, unloved, with out hope of ever being sewn into a useful and beautiful object.

On to the tutorial:


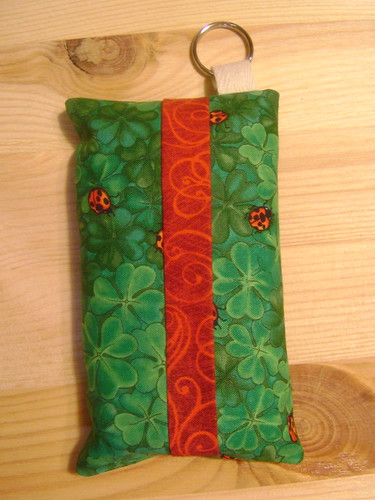
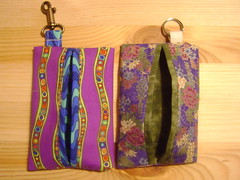
TRAVEL TISSUE Cover:

I started this tutorial about a week ago by searching for other folks' tutorials, there are a bunch out there. After reading a few of them I found I needed to change them, so here is my version of how to make this super simple gift.
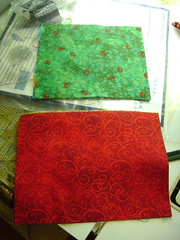
Cut out 2 fabrics:
Outside cover 6 x 7
Lining 6 x 8
All Seam 1/4 inch

Place fabric RST.
Using a 1/4 seam allowance. Sew one short side.
Line up the other short side, sew.
Then flip the tube right sides out.
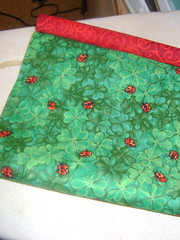
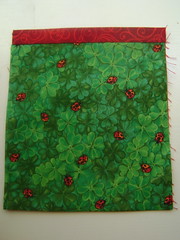
There will be approx 1/2 inch of the liner fabric showing in the front of your cover.

Press one side so that no liner shows.
Press the other side with 1/2 inch of liner showing.
The two pieces of fabric should now be flat.
Optional, top stitch the exposed lining fabric.


BIG CHANGE from other TUTs
When I made my first couple I butted the two finisheded edges up. I did not like this, they were gappy and you could see the tissue inside, which meant that the tissues would get dirty! YUCK!


MY WAY:
OVERLAP the front of the travel case, thus hiding the tissue, keeping it clean and safe.

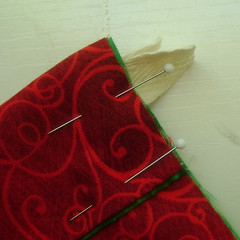
Fold over the finished edge with the exposed liner first.
Then fold over the plain finished edge. Stick a pin in it.
Rotate it to the other end and do it again. 

Tricky Tricky
Now for the hanger. If I don't attach a hook or a loop of some sort, everything ends up in the bottom of my purse, never to be seen again.
I used a 2 inch piece of twill tape (but you could use a scrap of the fabric from the cover) and a split ring. One of the dud examples I used a very nice Clover snap thingy, but I decided if I was going to sell these that the hook would make them too expensive (I think they retail @ 2.95). Plus in my stash I have loads of split rings.
Loop the Twill tape into the split ring.


Slide the twill tape and the ring into the top end (top is only important if the fabric is directional).
Make sure you are sliding the ring between the two layers of the COVER fabric and NOT between the liner and the cover.
Make sure the ring is in far enough so that you will not hit it with your sewing machine foot.
Put a pin in the tape so it stays put.

Sew both short ends.
Optional: Finish the raw edges with a zig zag stitch.

Turn right sides out and you are done.
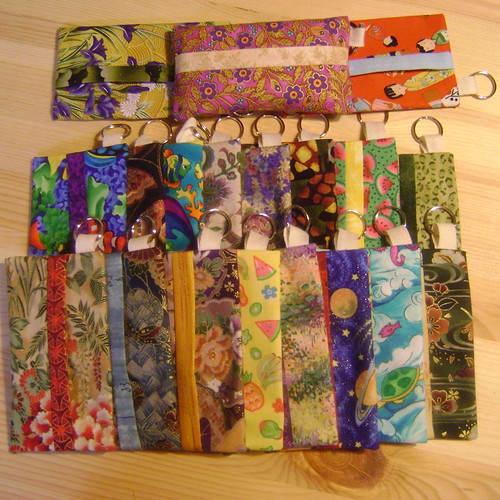
Unless you are me, then you make 20+ more


Maybe I am done now, but I doubt it cause I barely made a dent in the pile of fabric.

More Can Can Earrings


New dies came in this week and we have more unique earrings, book marks & necklaces. Each charm is hand cut then attached to an appropriate dangle.


2. Scalloped Heart Can Can Earrings, 4. AeroPlane Can Can Earrings, 5. Alien Head Can Can Earrings, 6. Shamrock Can Can Earrings, , 8. Celtic Clover Can Can Earrings

Introducing Sloth Craft

Drum Roll Please!

Sloth Craft: the division of Some Art that is all about the crafty things we make.

Last year we designed an ornament to give to friends and family and it was a huge hit. Fueled by the success, I designed a few more and they are ready to go PUBLIC. (Although if you were at the last Kraftworks you got a sneaky peek).


The Sloth Craft elves are ready to get the holiday season started with a beautiful line of repurposed, reclaimed and reseen holiday ornaments that you can feel good about giving and of course keeping for your holiday heirlooms.

Each ornament is made by hand in the USA using a variety of materials with an eye towards unique and creative misuse.

Featured Exclusively at SomeArtFabric.com

Turtle Love

My nephew love turtles, in this family having a fav anything is license for the most bizarre gifts. This year I made him a plushie.

From Some Art Talk

Julia wrote him a letter earlier this year asking him when he would be visiting, she cut the paper out in the shape of a turtle. I copied her shape to use as my pattern. I used scraps from my recycled clothing box, jeans and a great shirt of hubby's.

Snakey Love

This gift idea came from Dot at Dabbled. I could not use her tutorial because I had already cut all of my sleeves open but what a great gift for a boy.

From Some Art Talk


Here are the girls modeling Super Snake. The gift is intended for their cousin, who we will see on Christmas day. This was a bit of a pain to turn and stuff, but my girls love it so much I needed to get it wrapped before thy pulled Snakey apart.

From Some Art Talk

Handmade Holiday Ornament

I started working on a design for this holiday ornament after I saw an older version of it in a picture from my childhood. I made a few by hand but eventually found someone to create a die cut for my Accu Cut so I could cut them out in bulk. The girls and I made some holiday paper during Thanksgiving Break and I am just finishing up the ornaments. I will do a tutorial if there is interest.

From Colleen


Here is a better look at the ornament:
From Some Art Talk


Here is the bmp I used to make the ornament:

Lot o' Monster Backpack Clips

Lot o' Monster Backpack Clips

Hi I posted this as a craftster Holiday Challenge.
Voting starts soon so please vote us in! The girls would love the prizes.

Posted using ShareThis

Singlet Grocery Bag


Singlet Grocery Bag
Originally uploaded by renaanne
A friend of mine found this great tutorial and I made one up today. I messed up the front pocket cause I can't measure but it is a nice sturdy shopping bag. I think I will make them for some of my extended family.

This will be a great stash buster, depending on the bag you use as your pattern it uses about 2/3 yards of fabric for the exterior and 2/3 for the lining.

Criss Cross Coaster by Allsorts

I found this tutorial by Allsorts last year a bit too close to Christmas to really make any, I filed it away as cool and revisited this a.m.

Coaster, you say, What is so exciting about them?

WELL -- Let me tell you!! These coaster walk, they talk, .... Just Kidding. They are fun, super quick and easy to make. At first glance they look like a regular four patch BUT NO they are folded four patches, so you can tuck a finger or a note inside of them.


Allsorts tutorial is great, since I originally used charm packs I did adjust the size of the square listed in her tutorial so I would not have to trim down my pre cut 5 inch square. I made this dozen in about an hour this morning.

The fabric used is a combo of Andover fabrics mostly from the Balarinji Whales & Tales line. I am making a table ensemble so stay tuned for matching napkins, napkin rings, and trivets.

3 Bags One Pattern

Some patterns are so easy that you wonder why you get them but I was looking for a great introductory pattern for teaching a group of tweens to sew. The Kwik Sew 3597 Pattern hit the spot, an easy to make unlined tote with and an internal pocket attached to the top facing. This pattern will amuse you if you have been sewing for 20 years but if you are teaching some one to sew they will appreciate the thorough, easy to follow instructions and the quick results.

I used Corona Canvas as my base. I love this fabric. Corona canvas is a finely finished fabric that is thinner than most canvas. I originally purchased it to make pants, it comes in a bunch of great colors, but I use it for all kinds of stuff that needs a bit more body. The other fabrics are the scraps from other projects. All in all I love the bag pattern, I used the small size, which is great library tote or purse, I think the largest size would make a good shopping bag. This summer I am trying to get as many samples done as possible, so stay tuned, there are more quilts and bags on the worktable.

Steno Pad Cover

We all keep lists, why not keep them in style, create this book cover with pockets and a stylish loop closure system that uses your pencil to keep your cover closed. You are always ready to take notes.

This is pattern is perfect for scraps. I include simple info on how I created this pattern so if you want to cover a different size notebook you should be good to go.

This is a great gift for yourself and others, pick 2-3 fabrics and get started.

Make one for your next sewing retreat or class.

This is my first official tutorial and it took longer to write out the directions than it did to make a couple of them. The PDF should be easy to download and print out.

New Books from Lark

Oh thank all powers for Lark Books, they create some of the greatest craft books. I don't purchase a lot of books for the store but I personally wanted these books. They are chock full of great ideas for holiday gift giving. These books are a great gift idea but the projects are even better.

Last night the girls and I went to get some much needed Thai food and while we waited for our carry out we sat on the steps and put sticky noted on all the projects we want to make. Needless to say the books have a lot of pink, green and blue post it notes in them.

I am particularly fond of the pretty little series and can't wait to start making projects from those great books; Pretty Little Patchwork,PL Pot Holders, PL Purses & PL Pincushions (four books in all).


My daughters love Invasion of the Plush Monsters, I think they marked every page.

New Patterns from Melly & Me


Well, I am automatic order with the folks in Upper Ferntree Gully and there are new patterns in from Melly and her sister Rosalie Quinlan. Introducing Petunia, Dudley, Florance, Blossom the butterfly and a new purse pattern Flower Garden. We also added one of their quilt patterns Billie, which I am making a sample of using Malibu Monkey.
From Rosalie we have 6 of her beautiful primitive dolls and her new book called Gifts which is perfect for those of you starting your holiday gift making. Proceeds from her book support Breast Cancer Research, she is a surviver.

Peace on Earth from Moda


I can smell a traditional Olde Tyme Christmas in our future. Peace on Earth from Moda hits all of the right spots. It even HAS spots... er, okay DOTS! Dots, stripes, holly, evergreen, berries and to really bring the spirit of Peace on Earth, we even see old world maps for the truly global Christmas. I can see a holiday tables set with hand made cloth napkins and table runners. Or couple of new stockings for those extra guests or last minute gifts.

Berries and maps make great shopping totes and gift bags too. Where to start? At the Some Art Fabric Christmas Shop of course!

This pattern book is a great resource for all of these ideas. Happy Hour contains super simple quilts, a tote bag, table runner, and pillow.

Indie Craft Experience 08

I had a super cool crafter day. We went to the Lucky # 7 Indie Craft Experience at Centienial Park in good ole HOT Atlanta GA! Last night we had a huge thunder shower and I was afraid the weather would be gross for the show, but it was beautiful, a super wilty 105 ish and I felt bad for the vendors at the show but man what a great event.

The first booth was the welcome station were we picked up a muslin totes with excellent swag. Our next stop was at the Craft: booth. I ordered a subscription and received a copy of the magazine. We stopped at the Janome booth and received a free Kwik Sew Pattern 3133. Perfect hat and tote pattern and then entered a raffle for a free sewing machine. I purchase 3 screen printed tee shirts from three different booth and a ceramic spoon rest to replace our recently broken one.

The green "shiver me timbers" came from Firefly Designs
The red pig tailed skull came from Bunnyorama
The pink tee with the monkey came from Sheriff Peanut

Desi got the cute robot from Fatty Cakes I will get her to post where all of her other stuff came from.

FYI for artist:
I had a difficult time listing all of you great crafters because some of you guys did not actually tag your products so I can stop by and shop online. Luckily the organizer created such a great info pack that those of us with time and a good memory will be able to figure out where we made our purchases.

Other FAV booth were Sublime Stitching, when am I going to have time to do that!! and Katy Dement , the paper lady.

Event Critique
First, it was easy to find, look for the tents, I did not see a lot of signage but the tents were a dead give away and then I saw the signs, parking was not bad although a bit pricey at $10.00 bucks. We were there right at 11:00 so we were able to find a parking space that was shaded -- super PLUS. We did not hit any traffic but we came down Lucky Street.

I stumbled upon this event by luck through my Atlanta Printmaking Yahoo group and I am happy I did but I never heard a single radio ad for it. That said, it appeared to be fairly well attended.

Their web site is well done and so is their event brochure. The brochure is informative with a map and a list of vendors and their web info. I know I will spend some time visiting all of their vendors online in the cool comfort of my home. There was a wide variety of different crafts, a great bit of recycled items that sparked my interest, although I did not want to lug around a air plane made of aluminum cans from Waldenour (their shop is local so I will visit them soon).

I will certainly join the ICE Atlanta mailing list and spread the news. I also hope to join the Atlanta Craft Mafia. I hope they are sponsoring some thing closer to the holiday when I can go a bit more wild in my shopping.

Thumbs WAY up to all the crafters and I can't wait to visit you online.

Do You Sew?


I bet you are wondering just that. Where are the sewing projects, ideas etc! Well I have finally finished a small sewing project for next weekend. I wanted to have a super simple beginner project to demo at Lakewood, so I went searching for a free bib pattern. I found a great one with a down loadable PDF at Chickpea Studio. I made my bib reversible with 2 pieces of Amy Schimler fabric. It might be more absorbant with a plain flannel on the back but I love the fabric too much to use plain. The bib is a cute size for an infant up to one year, more of a drool bib.

Chickpea also has a burp cloth tutorial that I peeked at but I decided to make mine a bit easier. I just cut down the rest of my fat quarter (after making the bib) into a rectangle then cut a piece of matching towel (one is a new diaper). Sew right sides together, turn and top stitch. This makes a cute gift that I managed to eek out in less than an hour.

Cathedral Windows and Yo Yo Ornaments


Handmade for the holidays is hard. 
This past weekend I was at a very slow show and I managed to make 120 plus yo yos to string into wreaths and I found a cool ornament in our holiday stuff that I made about 6 years ago using the  Cathedral Windows block. 

The yo yos are made using the large Clover yo yo maker, stringing about 20 of them together and tying them up tight.  I think they need some noise, like jingles or maybe just some ribbon.
The Cathedral Windows Ornament is a bit harder to explain but I started with 2 nine inch squares of fabric, which I sewed up like you would start a CW quilt. I need to refine them a bit but if there is an interest I will try to post some how to pictures.

last minute gift - placemats

Not too long ago, I discovered a quick, satisfying project that allows me to use up some of my fabric without committing to a huge project, like a quilt. Placemats. It's a nice simple creative outlet for crazy times like December.

Materials (for 4 placemats)*:
1 yard quilt batting or flannel
1 yard for placemat fronts
1 yard for placemat backs
2/3 yard for binding fabric


For myself, I prefer to mix and match fabrics to create a funky dinner layout. But right now, I'm making those last minute gifts. So the fabric combinations aren't quite as off beat. I used red-and-green paisley for one side; Christmas trees for the other. The binding is shiny gold.

From each of the placemat fabrics and the batting, I cut rectangles that are about 15 X 18. There was no need to be overly precise, because after I quilted the 3 layers of each together, I squared up the corners before binding.

The quilting is really one of the best parts of this project. I put on one of my favorite December CD's - Trans-Siberian Orchestra's Chrismas Attic. Now this is an important aspect of constructing these last-minute-Christmas-gifts, so if you try this, be sure to select music you love.

I put some variegated green-and-red thread in the needle of my machine; gold metallic thread in the bobbin and inserted my walkin' foot. Then I just gently stitched waves down the length of each placemat, sometimes just rotating it at the end and starting back in the other direction. The goal is to have no goal. That is, I enjoyed gently guiding the fabric in long unplanned curves, allowing them to cross.

Then I stay-stitched about 1/4" from each edge and took it to my cutting board to square up the corners. I tried to make the placemats a consistent size - about 14x17. Then I cut the binding 2" wide because I didn't think I'd have enough of it to go with my usual 2.5" wide binding. I also made the binding single thickness, since this isn't exactly an heirloom project.

So now I have some hand sewing left to finish the binding. This is TV-watching or car-riding stuff. I have a bit of both coming up soon.

*When I have made the funky versions for myself, I need only about a fat quarter of each fabric. This is a fun way for me to use a small piece of fabric I just need to play with.

Made by Others !

Cool Stuff I purchased at local artist sales.

I don't know who the artist is on these pots. I will take a look see on their bottoms.

Love this bug!! Kathy Walton is the artist name.

Need to look up this artist too. These were actually purchased for my 10th anniversary, but I am hoping I will get some more flowers for the holiday.

Handmade by ME!

Works in progress.


LinkWithin

Related Posts with Thumbnails